Rsync with telegram notifications
create a new script with: nano script.sh and paste the following:
#!/bin/bash
set -e  # Exit immediately on error
SHELL=/bin/sh

# Specifications
SOURCES=("<SourceDir>" )
TARGET="<TargetDir"

LOGFILE="rsync.log"
BOT_API_TOKEN='<BotAPIToken>'
CHAT_ID='<ChatID>'
# Check if the logfile exists and delete it if it does
if [ -e "$LOGFILE" ]; then
 rm "$LOGFILE"
fi

# Check if /mnt/appbackups is already mounted
if ! mountpoint -q /mnt/<Share>; then
# Mount share and check for errors
if ! mount -t cifs //<IP>/<Share> /mnt/<Directory> -o domain=<DOMAIN>,username=<USER>,password=<PASSWORD>,file_mode=0777,dir_mode=0777; then
 MSG=$'\xE2\x9D\x8C ERROR Mounting Share
Mount operation failed.

 # Send the error message to Telegram and exit
 curl --data "parse_mode=html" --data "chat_id=${CHAT_ID}" --data-urlencode "text=${MSG}" 'https://api.telegram.org/bot'${BOT_API_TOKEN}'/sendMessage'
 exit 1
fi
fi

#Delete files older then 7 days
find /mnt/<Directory> -mtime +7 -name '*.unf' -delete

# Perform the backup using rsync
rsync -a --delete --log-file=$LOGFILE --log-file-format="%t %f %'b" $SOURCES $TARGET

        RESULT=$?

#unmount share
umount /mnt/<Share>

if $RESULT -gt 0
then
  MSG=$'\xE2\x9D\x8C Rsync error
Error copying files

Log:
'$(cat rsync.log)

else
  MSG=$'\xE2\x9C\x85 SUCCESS Rsync
Copying files succeeded

Log:
'$(cat rsync.log)
fi

 curl --data "parse_mode=html" --data "chat_id=${CHAT_ID}" --data-urlencode "text=${MSG}" 'https://api.telegram.org/bot'${BOT_API_TOKEN}'/sendMessage'
This script will mount a share then proceed to sync the files and also delete files older then 7 days. Replace all the values within <> to ones that suits your needs.
make the script executable with sudo chmod +x script.sh
To make it auto run: sudo crontab -e
And paste the following:
0 1 * * * /location/of/script.sh
This will make the script run every night at 01:00
Robocopy with Telegram notifications
Create a new powershell script and paste the following code:
#Set Parameters
$SourceFolder = "<ChangeMe>"
$DestinationFolder = "<ChangeMe>"
$Logfile = "<ChangeMe>.log"
$Telegramtoken = "<ChangeMe>"
$Telegramchatid = "<ChangeMe>"
#Run robocopy
Robocopy $SourceFolder $DestinationFolder /MIR /FFT /Z /XA:H /W:5 /NOOFFLOAD /NP /J /LOG:$Logfile
#Stylize the logfile
((Get-Content -path $Logfile -Raw) `
-replace '-------------------------------------------------------------------------------','------------------------------------------------------------------------------' `
-replace '------------------------------------------------------------------------------','<b>------------------------------------------------------------------------------</b>%0A' `
-replace 'ROBOCOPY :: Robust File Copy for Windows','<b>ROBOCOPY :: Robust File Copy for Windows</b> ' `
-replace 'Started :','%0A<b>Started :</b>' `
-replace 'Source :','%0A<b>Source :</b>' `
-replace 'Dirs :','%0A<b>Dirs :</b>' `
-replace 'Dest :','%0A<b>Dest :</b>' `
-replace 'Bytes :','%0A<b>Bytes :</b>' `
-replace 'Times :','%0A<b>Times :</b>' `
-replace 'Files :','%0A<b>Files :</b>' `
-replace 'Options :','%0A<b>Options :</b>' `
-replace 'Speed :','%0A<b>Speed :</b>' `
-replace 'Ended :','%0A%0A<b>Ended :</b>' `
-replace 'New File','%0A<b>New File</b>' `
-replace ' ','%0A' `
-replace 'EXTRA File','%0A<b>*EXTRA File</b>' ) `
| Set-Content -Path $Logfile
$Message = Get-Content $LogFile
#Send message via telegram bot
[Net.ServicePointManager]::SecurityProtocol = [Net.SecurityProtocolType]::Tls12
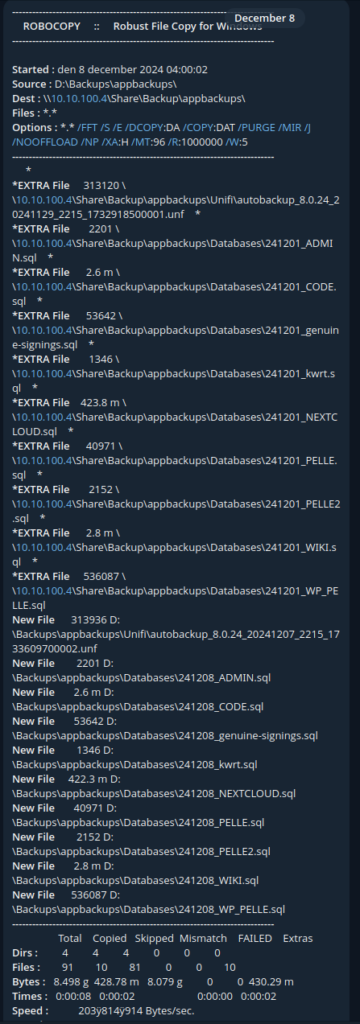
$Response = Invoke-RestMethod -Uri "https://api.telegram.org/bot$($Telegramtoken)/sendMessage?chat_id=$($Telegramchatid)&text=$($Message)&parse_mode=Html" -ContentType "application/html;charset=utf-8"Of course replace all the <ChangeMe> with suiting values for your needs
This is what a notification looks like for me when it has finished
Minecraft server as a service in linux
This will show you how to run a mincecraft server as a service in linux
sudo nano /etc/systemd/system/MinecraftServer.serviceand paste the following, you will have to do some modifications to this:
 [Unit]
 After=network.service

 [Service]
 WorkingDirectory=/your/mincecraftserver/location/
 ExecStart=/usr/bin/screen -AmDS "Minecraftserver" /usr/bin/java -jar /your/mincecraftserver/location/server.jar
 User=<Your linux user>
 ExecStop=screen -p 0 -S Minecraftserver -X eval 'stuff "say SERVER SHUTTING DOWN. Saving map..."\015'
 ExecStop=screen -p 0 -S Minecraftserver -X eval 'stuff "save-all"\015'
 ExecStop=screen -p 0 -S Minecraftserver -X eval 'stuff "stop"\015'
 ExecStop=sleep 10

 [Install]
 WantedBy=default.target
Then paste the following commands to make it executable
 sudo chmod +x /etc/systemd/system/servicenamn.service
 sudo chmod 755 /etc/systemd/system/servicenamn.service
To make the server autostart you simply type
sudo systemctl enable MinecraftServer
And to manually start and stop the server:
sudo systemctl start MinecraftServer
sudo systemctl stop MinecraftServer
if you want to enter the console for the minecraft server you type:
screen -r Minecraftserver
and to exit the console press:
ctrl +a +d
You can do this with as many minecraft servers as you like, just give each service a different name and also change Minecraftserver lines to something unique for each
Enable RTMP stream on unifi cameras
ssh into your camera and paste the following one-liner:
echo createService ip=0.0.0.0 port=1935 protocol=inboundRtmp | nc 127.0.0.1 1112 -w 1 -i 1Then to access the stream: rtmp://<ip.address.of.camera>:1935/live/s0
NOTE: this wont survive a reboot and the procedure needs to be done every time the camera has lost its power
WordPress behind Nginx Proxy Manager
To get wordpress to play nicely behind Nginx Proxy manager you will have to do a few changes
Edit your wp-config.php and add the following lines:
if (!empty($_SERVER['HTTP_X_FORWARDED_PROTO']) && $_SERVER['HTTP_X_FORWARDED_PROTO'] == 'https') {
$_SERVER['HTTPS']= 'on';
}

if (!empty($_SERVER['HTTP_X_FORWARDED_HOST'])) {
$_SERVER['HTTP_HOST'] = $_SERVER['HTTP_X_FORWARDED_HOST'];
}
$_SERVER['HTTPS'] = 'on';
And if you get error when logging into wp-admin you need to add this aswell to the top of wp-config.php:
define('FORCE_SSL_ADMIN', true);
if (strpos($_SERVER['HTTP_X_FORWARDED_PROTO'], 'https') !== false)
    $_SERVER['HTTPS']='on';
in nginx proxy manager on the proxy host in advanced tab you will have to add:
proxy_set_header X-Forwarded-Proto $scheme;
proxy_set_header X-Forwarded-For $proxy_add_x_forwarded_for;
proxy_set_header X-Real-IP $remote_addr;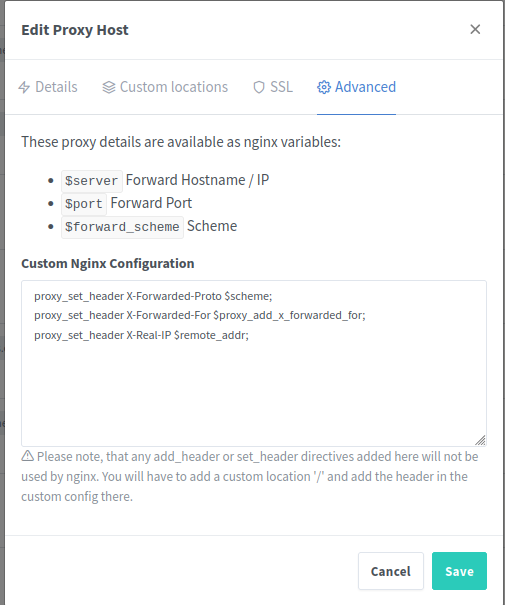
b00tify, a wordpress theme by Pelle